
I made some good progress on my QuickDraw Viewer viewer, which now supports most QuickDraw operations, as well as many embedded QuickTime formats, including all three original QuickTime codecs: Apple Video (RPZA), Apple Graphics (smc) and Apple Animation (RLE). There are still quirks and bugs, of course, but it works, much better than Apple’s own Preview App (Version 11.0) on my M1 Laptop running Version 14.4.
How much better? I already wrote a post about region support, but regions were not well supported by most printer drivers. Let’s talk about basics. The simplest test is to take the canonical Picture defined in Listing A-5 of the Inside Macintosh book Imaging With QuickDraw. The source code is given in resource definition format.
data 'PICT' (128) {
$"0078"     /* picture size; don't use this value for picture size */
$"0000 0000 006C 00A8"  /* bounding rectangle of picture at 72 dpi */
$"0011"     /* VersionOp opcode; always $0011 for extended version 2 */
$"02FF"     /* Version opcode; always $02FF for extended version 2 */
$"0C00"     /* HeaderOp opcode; always $0C00 for extended version 2 */
            /* next 24 bytes contain header information */
   $"FFFE"  /* version; always -2 for extended version 2 */
   $"0000"  /* reserved */
   $"0048 0000"         /* best horizontal resolution: 72 dpi */
   $"0048 0000"         /* best vertical resolution: 72 dpi */
   $"0002 0002 006E 00AA"  /* optimal source rectangle for 72 dpi horizontal
                              and 72 dpi vertical resolutions */
   $"0000"  /* reserved */
$"001E"     /* DefHilite opcode to use default hilite color */
$"0001"     /* Clip opcode to define clipping region for picture */
   $"000A"  /* region size */
   $"0002 0002 006E 00AA"  /* bounding rectangle for clipping region */
$"000A"     /* FillPat opcode; fill pattern specified in next 8 bytes */
   $"77DD 77DD 77DD 77DD"  /* fill pattern */
$"0034"     /* fillRect opcode; rectangle specified in next 8 bytes */
   $"0002 0002 006E 00AA"  /* rectangle to fill */
$"000A"     /* FillPat opcode; fill pattern specified in next 8 bytes */
   $"8822 8822 8822 8822"  /* fill pattern */
$"005C"
$"0008"
$"0008"
$"0071"
/* fillSameOval opcode */
/* PnMode opcode */
/* pen mode data */
/* paintPoly opcode */
   $"001A"  /* size of polygon */
   $"0002 0002 006E 00AA"  /* bounding rectangle for polygon */
   $"006E 0002 0002 0054 006E 00AA 006E 0002"   /* polygon points */
$"00FF"     /* OpEndPic opcode; end of picture */
};
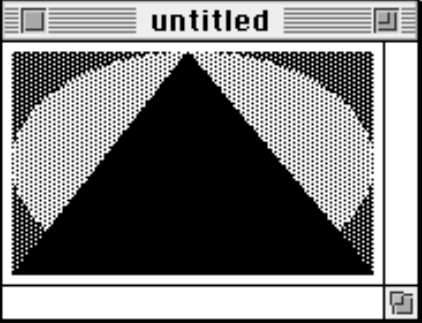
The expected result is presented in the book, see the picture. The process to convert this file into an actual picture on a modern macintosh is a bit involved:
- First you compile the resource with the
rezutility:rez im_pict.r -o im_pict.rsrc
- You then open the
im_pict.rsrcfile with the ResForge program. - There you select the pict resource and open it with the Hex editor, and copy the data
- You open the HexFiend program, and paste the data and save it into
im_pict.raw. - You create a file with 512 bytes:
dd if=/dev/zero of=buffer bs=512 count=1. - You create the final file with concatenating the 512 bytes buffer with the actual data:
cat buffer im_pict.raw im_pict.pict
Simple. If you just want to the see the binary file, you can download it directly. So how well does Preview handle it? Here’s a screen capture. For a comparison, the pictured rendered by my code is the first one in the post.

One thought on “Doing Better than Apple…”